General Internet security
Before we get into the security of your wireless LAN, we need to talk for a
moment about Internet security in general. Regardless of what type of LAN
you have — wireless, wired, a LAN using powerlines or phonelines, or even no
LAN — when you connect a computer to the Internet, some security risks are
involved. Malicious crackers (the bad guys of the hacker community) can use
all sorts of tools and techniques to get into your computer(s) and wreak havoc.
For example, someone with malicious intent could get into your computer
and steal personal files (such as your bank statements that you’ve downloaded
using Quicken) or mess with your computer’s settings . . . or even
erase your hard drive. Your computer can even be hijacked (without you
knowing it) as a jumping off point for other people’s nefarious deeds; as a
source of an attack on another computer (the bad guys can launch these
attacks remotely using your computer, making them that much harder to
track down); or even as source for spam e-mailing.
What we’re getting at here is the fact that you need to take a few steps to
secure any computer attached to the Internet. If you have a broadband (digital
subscriber line [DSL], satellite, or cable modem) connection, you really
need to secure your computer(s). The high speed, always-on connections
that these services offer make it easier for a cracker to get into your computer.
We recommend that you take three steps to secure your computers
from Internet-based security risks:
Use and maintain antivirus software. Many attacks on computers don’t
come from someone sitting in a dark room, in front of a computer screen,
actively cracking into your computer. They come from viruses (often
scripts embedded in e-mails or other downloaded files) that take over
parts of your computer’s operating system and do things that you don’t
want your computer doing (like sending a copy of the virus to everyone in
your e-mail address book and then deleting your hard drive). So pick out
your favorite antivirus program and use it. Keep the virus definition files
(the data files that tell your antivirus software what’s a virus and what’s
not) up to date. And for heaven’s sake, use your antivirus program!
Install a personal firewall on each computer. Personal firewalls are programs
that basically take a look at every Internet connection entering or
leaving your computer and check it against a set of rules to see whether
the connection should be allowed. After you’ve installed a personal firewall
program, wait about a day and then look at the log. You’ll be shocked
and amazed at the sheer number of attempted connections to your computer
that have been blocked. Most of these attempts are relatively
innocuous, but not all are. If you’ve got broadband, your firewall might
block hundreds of these attempts every day.
We like ZoneAlarm — www.zonelabs.com — for Windows computers,
and we use the built-in firewall on our Mac OS X computers.
Turn on the firewall functionality in your router. Whether you use a
separate router or one integrated into your wireless access point, it will
have at least some level of firewall functionality built in. Turn this function
on when you set up your router/access point. (It’ll be an obvious
option in the configuration program and might well be on by default.)
We like to have both the router firewall and the personal firewall software
running on our PCs. It’s the belt-and-suspenders approach, but it
makes our networks more secure.
In Chapter 12, we talk about some situations (particularly when you’re
playing online games over your network) where you need to disable
some of this firewall functionality. We suggest that you do this only
when you must. Otherwise, turn on that firewall — and leave it on.
Some routers use a technology called stateful packet inspection firewalls,
which examine each packet (or individual group) of data coming into the
router to make sure that it was actually something requested by a computer
on the network. If your router has this function, we recommend
that you try using it because it’s a more thorough way of performing firewall
functions. Others simply use Network Address Translation (NAT,
which we introduce in Chapter 2 and further discuss in Chapter 16) to
perform firewall functions. This isn’t quite as effective as stateful packet
inspection, but it does work quite well.
There’s a lot more to Internet security — like securing your file sharing (if
you’ve enabled that) — that we just don’t have the space to get into. Check
out Chapter 11 for a quick overview on this subject. To get really detailed
about these subjects, we recommend that you take a look at Home Networking
For Dummies, by Kathy Ivens (Wiley Publishing, Inc.) for coverage of those
issues in greater detail.
After you’ve set up your firewall, test it out. Check out this great site that has
a ton of information about Internet security: www.grc.com. The guy behind
this site, Steve Gibson, is a genius on the topic, and he’s built a great tool
called ShieldsUP!! that lets you run through a series of tests to see how well
your firewall(s) is working. Go to www.grc.com and test yourself.
Saturday 28 February 2009
Airlink security
Airlink security
The area that we really want to focus on in this chapter is the aspect of network
security that’s unique to wireless networks: the airlink security. In other
words, these are the security concerns that have to do with the radio frequencies
being beamed around your wireless home network.
Traditionally, computer networks use wires that go from point to point in
your home (or in an office). When you’ve got a wired network, you’ve got
physical control over these wires. You install them, and you know where they
go. The physical connections to a wired LAN are inside your house. You can
lock the doors and windows and keep someone else from gaining access to
the network. Of course, you’ve got to keep people from accessing the network
over the Internet, as we mention in the previous section, but locally it would
take an act of breaking and entering by a bad guy to get on your network.
(Sort of like on Alias where they always seem to have to go deep into the
enemy’s facility to tap into anything.)
Wireless LANs turn this premise on its head because you’ve got absolutely no
way of physically securing your network. Now you can do things like go outside
with a laptop computer and have someone move the access point around
to reduce the amount of signal leaving the house. But that’s really not going
to be 100 percent effective, and it can reduce your coverage within the house.
Or you could join the tinfoil hat brigade (“The CIA is reading my mind!”) and
surround your entire house with a Faraday cage. (Remember those from
physics class? Us neither, but they have something to do with attenuating
electromagnetic fields.)
Some access points have controls that let you limit the amount of power
used to send radio waves over the air. This isn’t a perfect solution (and it can
dramatically reduce your reception in distant parts of the house), but if you
live in a small apartment and are worried about beaming your Wi-Fi signals to
the apartment next door, you might try this.
Basically, what we’re saying here is that the radio waves sent by your wireless
LAN gear are going to leave your house, and there’s not a darned thing
that you can do about it. Nothing. What you can do, however, is make it difficult
for other people to tune into those radio signals, thus (and more importantly)
making it difficult for those who can tune into them to decode them
and use them to get onto your network (without your authorization) or to
scrutinize your e-mail, Web surfing habits, and so on.
You can take several steps to make your wireless network more secure and to
provide some airlink security on your network. We talk about these in the following
sections, and then we discuss some even better methods of securing
wireless LANs that are coming down the pike.
Introducing Wired Equivalent Privacy (WEP)
Introducing Wired Equivalent
Privacy (WEP)
The primary line of defense in a Wi-Fi network is Wired Equivalent Privacy
(WEP). WEP is an encryption system, which means that it scrambles — using
the encryption key (or WEP key, in this case) — all the data packets (or individual
chunks of data) that are sent over the airwaves in your wireless network.
Unless someone on the far end has the same key to decrypt the data,
he (theoretically) won’t be able to make heads nor tails of it. It’ll be gibberish.
So even though your data is beamed right through the side of the house
into that snooper’s PC, it will arrive in an unreadable form.
WEP also has a second security function: Not only does it encrypt your data
being transmitted over the airlink, it also can be used to authenticate users
connecting to the access point. In other words, not only do you need a WEP
key to decode data transmitted over the airlink, but you also need a WEP key
to get your computer connected to the access point in the first place. If an
access point has WEP enabled and you don’t have the key, you can try and
try, but you’ll never get connected to it.
Although the WEP key itself is a long series of numbers and letters, you often
don’t have to make up this key yourself. (It’s harder than you think to just
spew out some random numbers and letters.) Instead, you just have to enter
a pass phrase (some regular English words that you can remember), and the
software will use this pass phrase to generate the key for you.
How about a bit more about WEP?
How about a bit more about WEP?
WEP encrypts your data so that no one can read it unless they have the key.
That’s the theory behind WEP, anyway. WEP has been a part of Wi-Fi networks
from the beginning. (The developers of Wi-Fi were initially focused on
the business market, where data security has always been a big priority.) The
name itself belies the intentions of the system’s developers; they wanted to
make wireless networks as secure as wired networks.
In order for WEP to work, you must activate WEP on all the Wi-Fi devices in
your network via the client software or configuration program that came with
the hardware. And every device on your network must use the same WEP key
to gain access to the network. (We talk a bit more about how to turn on WEP
in the “Clamping Down on Your Wireless Home Network’s Security” section of
this chapter.)
For the most part, WEP is WEP is WEP. In other words, it doesn’t matter
which vendor made your access point or which vendor made your laptop’s
PC card network adapter — the implementation of WEP is standardized
across vendors. Keep this one difference in mind, however: WEP key length.
Encryption keys are categorized by the number of bits (1s or 0s) used to
create the key. Most Wi-Fi equipment these days uses 128-bit WEP keys, but
some early gear (like the first generation of the Apple AirPort equipment)
supported only a 64-bit WEP key.
A few access points and network adapters on the market even support longer
keys, such as equipment from D-Link, which can support a 256-bit key. Keep in
mind that the longest standard (and common) key is 128 bits. Most equipment
enables you to decide how long to make your WEP key; you can often choose
between 64 and 128 bits. Generally, for security purposes, you should pick the
longest key available. If, however, you have some older gear that can’t support
longer WEP key lengths, you can use a shorter key. If you have one network
adapter that can handle only 64-bit keys but you’ve got an access point that
can handle 128-bit keys, you need to set up the access point to use the shorter,
64-bit key length.
You can almost always use a shorter-than-maximum key length (like using a
64-bit key in a 128-bit-capable system), but you can’t go the other way. So if
you set your access point up to use a 128-bit key, your older 64-bit network
adapter won’t be able to connect to it.
What’s wrong with WEP?
What’s wrong with WEP?
WEP sounds like a pretty good deal, doesn’t it? It keeps your data safe while
it’s floating through the ether by encrypting it, and it keeps others off your
access point by not authenticating them. In fact, it’s pretty good. Notice that
we didn’t say that WEP is great or superb or awesome. Just pretty good.
We’re actually being somewhat generous. With the proper tools and enough
network traffic to analyze, a dedicated network cracker can break WEP (or
independently figure out the WEP key by using some mathematical techniques)
in a relatively short time. In the business environment, where a ton of traffic is
traveling over the wireless network and valuable business secrets are part of
this traffic, this is a pretty big deal. The math to break WEP is pretty hard
(you’re not going to do it in your head), but plenty of freely available tools
are on the Web that let a computer do it relatively quickly.
We’re being generous with WEP because we strongly believe that in the home
environment — particularly in the suburbs and other less-than-densely populated
areas — the chances of you having someone who can pick up your signals
AND be motivated to go through all the trouble of breaking your WEP
code are pretty darn slim. No one’s ever tried to do it to us, and we don’t
know any folks who have had this happen to them at home. So we don’t
sweat it all that much.
But we do think that WEP needs to be improved. We use wireless networks at
work too, and we’d like additional security. The final section of this chapter,
“Looking into the Crystal Ball,” talks about some newer systems that are on
the way which will complement or supplant WEP entirely and offer greater
security.
We’re writing Wireless Home Networking For Dummies here, not Secure Office
Wireless Networks For Dummies. More sophisticated security systems are
available now for business networks that can improve upon the security of a
wireless LAN. Many of these systems rely upon using stronger encryption
systems called Virtual Private Networks (VPNs), which encrypt all data leaving
the PC (not just wireless data) with very strong encryption. You might
even have a VPN system on that work laptop that you bring home with you
every night. VPN is great, and as long as your router supports VPN tunneling,
you should be able to connect to the office network from your home LAN
using your VPN client. But VPN technology is not anywhere close to being
cheap, simple, and user-friendly enough to be something that we’d ever recommend
that you install in your house to secure your wireless LAN.
Clamping Down on Your Wireless Home Network’s Security
Clamping Down on Your Wireless
Home Network’s Security
Well, enough of the theory and background. Time to get down to business. In
this section, we discuss some of the key steps that you should take to secure
your wireless network from intruders. None of these steps are difficult, will
drive you crazy, or make your network hard to use. All that’s really required
is the motivation to spend a few extra minutes (after you’ve got everything
up and working) battening down the hatches and getting ready for sea. (Can
you tell that Pat used to be in the Navy?)
The key steps in securing your wireless network, as we see them, are the
following:
1. Change all the default values on your network.
2. Enable WEP.
3. Close your network to outsiders (if your access point supports this).
Hundreds of different access points and network adapters are available on
the market. Each has its own unique configuration software. (At least each
vendor does; and often, different models from the same vendor have different
configuration systems.) You need to RTFM (Read the Fine Manual!). We’re
going to give you some generic advice on what to do here, but you really,
really, really need to pick up the manual and read it before you do this to
your network. Every vendor has slightly different terminology and different
ways of doing things. If you mess up, you might temporarily lose wireless
access to your access point. (You should still be able to plug a computer in
with an Ethernet cable to gain access to the configuration system.) You might
even have to reset your access point and start over from scratch. So follow
the vendor’s directions (as painful at that may be — there’s a reason why
people buy For Dummies books). We tell you the main steps that you need to
take to secure your network; your manual will give you the exact line-by-line
directions on how to implement these steps on your equipment.
WEP key length: Do the math
If you’re being picky, you might notice that WEP
keys aren’t really as long as their names say
that they are. The first 24 bits of the key are actually
something called an initialization vector,
and the remaining bits comprise the key itself.
Therefore, 128-bit keys are really only 104 bits
long, and 64-bit keys are really only 40 bits long.
So when you enter a 128-bit key (and you do the
math), you’ll see that there are only 26 alphanumeric
characters (or digits) for you to enter in
the key (4 bits per digit × 26 = 104 bits). This isn’t
something that you really need to know
because everyone adds the 24 initialization
vector bits to the WEP key length number, but
just in case you were curious. . . .
Most access points also have some wired connections available — Ethernet
ports that you can use to connect your computer to the access point. You can
almost always use this wired connection to run the access point configuration
software. When you’re setting up security, we recommend making a wired connection
and doing all your access point configuration in this manner. That way,
you can avoid accidentally blocking yourself from the access point when your
settings begin to take effect.
Getting rid of the defaults
Getting rid of the defaults
It’s incredibly common to go to a Web site like Netstumbler.com, look at the
results of someone’s Wi-Fi reconnoitering trip around their neighborhood, and
see dozens of access points with the same exact Service Set Identifier (SSID,
or network name; see Chapter 2). And it’s usually Linksys because Linksys is
the most popular vendor out there. Many folks bring home an access point,
plug it in, turn it on, and then do nothing. They leave everything as it was set
up from the factory. They don’t change any of the default settings.
Well, if you want people to be able to find your access point, there’s
nothing better (short of a sign on the front door; check out our discussion of
warchalking — the practice of leaving marks on sidewalks to point out open
APs — in Chapter 16) than leaving your default SSID broadcasting out there
for the world to see. In some cities, you could probably drive all the way
across town with a laptop set to Linksys as an SSID and stay connected the
entire time. (We don’t mean to just pick on Linksys here. You could probably
do the same thing with an SSID set to default, D-Link’s default, or any of the
top vendor’s default settings.)
When you begin your security crusade, the first thing that you should do is
to change all the defaults on your access point. At a minimum, you should
change the following:
Your default SSID
Your default administrative password
You want to change this password because if you don’t, someone who gains
access to your network can guess at your password and end up changing all
the settings in your access point without you knowing. Heck, if they wanted
to teach you a security lesson — the tough love approach, we guess — they
could even block you out of the network until you reset the access point.
These default passwords are well known and well publicized. Just look on the
Web page of your vendor, and we bet that you’ll find a copy of the user’s
guide for your access point available for download. Anyone who wants to
know them does know them.
When you change the default SSID on your access point to one of your own
making, you’ll also need to change the SSID setting of any computers (or
other devices) that you want to connect to your LAN. To do this, follow the
steps that we discuss in this part’s earlier chapters.
This tip really falls under the category of Internet security (rather than airlink
security), but here goes: Make sure that you turn off the Allow/Enable Remote
Management function (it might not be called this exactly but something like
that). This function is designed to allow people to connect to your access point
over the Internet (if they know your IP address) and do any or all the configuration
stuff from a distant location. If you need this turned on (perhaps you have
a home office, and your IT gal wants to be able to configure your access point
remotely), you’ll know it. Otherwise, it’s just a security flaw waiting to happen,
particularly if you haven’t changed your default password. Luckily, most access
points have this set to Off by default, but take the time to make sure that
yours does.
Enabling WEP
Enabling WEP
After you eliminate the security threats caused by leaving all the defaults in
place (see the preceding section), it’s time to get some encryption going. Get
your WEP on, as the kids say.
We’ve already warned you once, but we’ll do it again, just for kicks: Every
access point has its own system for setting up WEP, and you need to follow
those directions. We can only give generic advice because we have no idea
which access point you’re using.
To enable WEP on your wireless network, we suggest that you perform the
following generic steps:
1. Open your access point’s configuration screen.
2. Go to the Wireless, Security, or Encryption tab or section.
We’re being purposely vague here; bear with us.
3. Select the radio button or check box labeled Enable WEP or Enable
Encryption or Configure WEP.
You should see a menu similar to the one shown in Figure 10-1. (This is
for a Siemens SpeedStream access point/router.)
4. Select the check box or the pull-down menu to the appropriate WEP
key length for your network.
We recommend 128-bit keys if all the gear on your network can support
it. (See the earlier section, “How about a bit more about WEP?,” for the
lowdown on WEP keys.)
5. Create your own key if you prefer (we prefer to let the program create
one for us):
a. Type a pass phrase into the Passphrase text box.
b. Click the Generate Keys button.
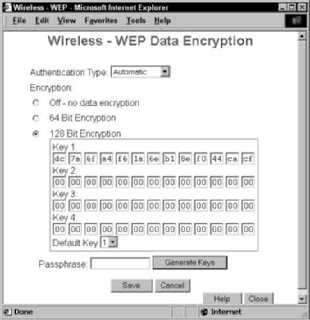
Figure 10-1:
Setting up
WEP on
a Speed-
Stream
access
point.
Remember the pass phrase. Write it down somewhere, and put it some
place where you won’t accidentally throw it away or forget where you
put it. Danny likes to tape his pass phrase note to the box that his Wi-Fi
gear came in so he’ll always be able to track it down.
Whether you created your own key or let the program do it for you, a
key should now have magically appeared in the key text box. Note: Some
systems allow you to set more than one key (usually up to four keys),
such as the system in Figure 10-1. In this case, use Key 1 and set this as
your default key by using the pull-down menu.
Remember this key! Write it down. You’ll need it again when you configure
your computers to connect to this access point.
Some access point’s configuration software won’t necessarily show you
the WEP key that you’ve generated — just the pass phrase that you’ve
used to generate it. You’ll need to dig around in the manual and menus
to find a command to display the WEP key itself. (For example, Apple’s
AirPort software shows just the pass phrase; you need to find the
Network Equivalent Password in the Airport Admin Utility to display the
WEP key — in OS X, this is in the Base Station Menu.)
The built-in wireless LAN client software on Windows XP numbers its
four keys from 0–3 instead of 1–4. So if you’re using Key 1 on your access
point, select Key 0 in Windows XP.
6. Click OK to close the WEP configuration window.
You’re done turning on WEP. Congratulations.
Can we repeat ourselves again? Will you indulge us? The preceding steps are
very generic. Yours might vary slightly (or in rare cases, significantly). Read
your user’s guide. It will tell you what to do.
Some access points will make you go through the extra step of requiring all
users to use WEP to connect to the access point. Look for a check box or
pull-down menu on your configuration screen with this option. If you don’t do
this, computers without your network’s WEP key might still be able to connect
to your access point.
After you configure WEP on the access point, you must go to each computer on
your network, get into the network adapter’s client software (as we describe in
Chapters 7 and 8), turn on WEP, and enter either the pass phrase or the WEP
key. Typically you’ll find an Enable Security dialog box containing a check box
to turn on security and one to four text boxes for entering the key. Simply
select the check box to enable WEP, enter your key in the appropriate text box,
and then click OK. Figure 10-2 shows this dialog box for a Proxim ORiNOCO PC
Card network adapter; the dialog box that you see is likely to be similar.
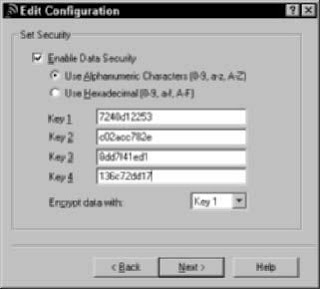
Figure 10-2:
Setting up
WEP on an
ORiNOCO
PC Card.
One area that is consistently confusing when setting up a WEP key — and
often a real pain in the rear end — is the tendency of different vendors to
use different formats for the keys. The most common way to format a key is
to use hexadecimal (hex) characters. This format represents numbers and
letters by using combinations of the numbers 0–9 and the letters A–F. (For
example, the name of Pat’s dog, Opie, would be represented in hexadecimal
as 4f 70 69 65.) A few other vendors use ASCII, which is simply the letters and
numbers on your keyboard.
Although ASCII is an easier-to-understand system for entering WEP codes (it’s
really just plain text), most systems make you use hexadecimal: It’s the standard.
The easiest way to enter hex keys on your computers connecting to
your access point is to use the pass phrase that we discuss previously. If
your network adapter client software lets you do this, do it! If it doesn’t, try
entering the WEP key itself that you wrote down when you generated it (it’s
probably hexadecimal). If that doesn’t work either, you might have to dig into
the user’s manual and see whether you need to add any special codes before
or after the WEP key to make it work. Some software requires you to put the
WEP key inside quotation marks; others might require you to put an 0h or 0x
(that’s a zero and an h or an x character) before the key or an h after it (both
without quotation marks).
Closing your network
Closing your network
The last step that we recommend you take in the process of securing your
wireless home network (if your access point allows it) is to create a closed
network — a network that allows only specific, pre-designated computers and
devices onto it. You can do two things to close down your network, which
makes it harder for strangers to find your network and gain access to it:
Turn off SSID broadcast: By default, most access points broadcast their
SSID out onto the airwaves. This makes it easier for users to find the network
and associate with it. If the SSID is being broadcast and you’re in
range, you should see the SSID on your computer’s network adapter
client software and be able to select it and connect to it. That is, assuming
that you have the right WEP key, if WEP is configured on that access
point. When you create a closed network, you turn off this broadcast so
that only people who know the exact name of the access point can connect
to it.
You can find access points even if they’re not broadcasting their SSID
(by observing other traffic on the network with a network sniffer program),
so this is an imperfect security measure — and no substitute for
enabling WEP. But it’s another layer of security for your network. Also, if
you’re in an area where you will have a lot of people coming into your
home and wanting to share your connection, you might not want to
close off the network, thus balancing convenience for your friends
against the small exposure of a more open network.
Set access control at the MAC layer: Every network adapter in the
world has a unique number assigned to it known as a Media Access
Controller (MAC) address. You can find the MAC address of your network
adapter either by looking at it (it’s usually physically printed on
the device) or using software on your computer:
• Open a DOS window and use the winipcnfg command in
Windows 95/98/Me or the ipconfig/all command on Windows
NT/2000/XP.
• Look in the Network Control Panel/System Preference on a Mac.
With some access points, you can type in the MAC addresses of all the
devices that you want to connect to your access point and block connections
from any other MAC addresses.
Again, if you support MAC layer filtering, you’ll make it harder for
friends to log on to when visiting. If you’ve got some buddies who like
to come over and mooch off your broadband connection, you’ll need to
add their MAC addresses as well, or they won’t be able to get on your
network. Luckily, you need to enter their MAC address only one time to
get them “on the list,” so to speak, so you won’t need to do it every time
they show up — at least until you have to reset the access point (which
shouldn’t be that often).
Neither of these “closed” network approaches is absolutely secure. MAC
addresses can be spoofed (imitated by a device with a different MAC address,
for example), but both are good ways to add to your overall security strategy.
Looking Into the Crystal Ball
The limitations of WEP have become a bit of an embarrassment to the wireless
industry. Although a whole big boatload of businesses has begun using
wireless LANs, many are waiting on the sidelines until security issues are a
bit better sorted out. And although we think that WEP is okay (but not great)
for home use, it’s certainly not good enough for a business that relies upon
the security of its data.
Several efforts are underway to create newer, better, and more secure ways
of protecting wireless LANs . . . efforts that will pay off for home users in the
long run. In this section, we talk about some of the most important of these
efforts and give you a quick overview of them.
This is our “Gaze into the crystal ball and chant voodoo incantations” section
of the chapter. None of this stuff is available yet (although some of it is due in
2003 . . . sometime . . .).
Waiting for WPA
Waiting for WPA
The Institute for Electrical and Electronics Engineers (IEEE — the group that
developed the standards for 802.11 networks; see Chapter 2) is working on a
long-term solution to WEP’s weaknesses (which we discuss in the following
section about 802.11i). In the meantime, the Wi-Fi Alliance (the group of vendors
that ensure the compatibility of Wi-Fi gear) has put together its own
interim solution for wireless LAN security called Wi-Fi Protected Access (WPA).
WPA is a new set of forward-compatible encryption and authentication
enhancements for 802.11 networks. Forward-compatible means that WPA will
work with newer systems that are currently being developed by the IEEE.
Other reasons to get excited about WPA include the following features that it
will offer:
More random encryption techniques: WPA has basically been designed
as an answer for all the current weaknesses of WEP, with significantly
increased encryption techniques. One of WEP’s fatal flaws is that its
encryption is not sufficiently random, meaning that an observer can
more easily find patterns and break the encryption. WPA’s encryption
techniques will basically be more random — and thus harder to break.
Automatic key changes: WPA also has a huge security advantage in the
fact that it automatically changes the key (although you, as a user, get to
keep using the same password to access the system). So by the time a
bad guy has figured out your key, your system would have already
moved on to a new one.
More user-friendly: WPA will also be easier for consumers to use
because there’s no hexadecimal stuff to deal with . . . just a plain text
password. The idea is to make WPA much easier to deal with than WEP,
which takes a bit of effort to get up and running (depending on how
good your access point’s configuration software is).
Backward compatibility: The best thing about WPA is that it’s being
designed to be backward compatible, too. Thus, existing Wi-Fi certified
equipment should be able to be upgraded to WPA by just installing a
downloadable software update.
The Wi-Fi alliance expects to begin certifying WPA equipment sometime in
early 2003. (We haven’t seen any yet, but it’s just a matter of time, as we write.)
The future: 802.11i
WPA is a great next step in wireless LAN security (see the preceding section),
but it’s not the end of the road. Well, face it . . . there is no end of the road.
Computers get more powerful, and the bad guys in the black hats who want
to break into the networks get smarter — so no system is going to be immune
to security breakdowns forever. Don’t think of security as something that you
can just figure out and put behind you; security is a
802.1x: The corporate solution
Another new standard that’s being slowly rolled
out into the Wi-Fi world is 802.1x. This isn’t an
encryption system but instead, an authentication
system. An 802.1x system, when built into
an access point, would allow users to connect
to the access point but give them only extremely
limited access (at least initially). In an 802.1x
system, the user would be able to connect to only
a single network port (or service). Specifically,
the only traffic that the user could send over the
network would be to an authentication server,
which would exchange information (such as
passwords and encrypted keys) with the user to
establish that he was actually allowed on the
network. After this authentication process has
been satisfactorily completed, the user is given
full (or partial, depending on what policies the
authentication server has recorded for the user)
access to the network.
802.1x is not something that we expect to see in
any wireless home LAN anytime soon. It’s really
a business-class kind of thing, requiring lots of
fancy servers and professional installation and
configuration. Just thought we’d mention it
because you’ll no doubt hear about it when
you search the Web for wireless LAN security
information.
The next step on this road, after WPA, is 802.11i. This is an entirely new
reconfiguration of wireless LAN security. Unlike WPA, it likely won’t work on
existing access points and network adapters, at least not all aspects of the
system. But sometime down the road, probably in 2004, you should start
seeing new generations of wireless LAN gear that incorporates 802.11i security
systems.
Perhaps the biggest advance that you’ll see when 802.11i hits the streets is
the system’s adoption of the Advanced Encryption Standard (AES). AES uses
very sophisticated encryption techniques and super-long keys (much bigger
than the 128-bit keys used by WEP) that take a really, really long time (even
with really fast computers) to break. With today’s technology, at least the
technology available to regular people, AES is essentially unbreakable.
802.11i also includes other security measures (like support for 802.1x, which
we discuss in a nearby sidebar) that help really tighten up wireless LAN security.
So 802.11i should be worth the wait. In the meantime, use what you have
(WEP), and you’ll be fine.
Putting Your Wireless Home Network To Work
Remember that old Cracker Jack commercial of the guy sitting in the bed
when the kid comes home from school? “What’d you learn in school
today?” he asks. “Sharing,” says the kid. And then out of either guilt or good
manners, the old guy shares his sole box of caramel popcorn with the kid.
You shouldn’t hog your caramel popcorn, and you shouldn’t hog your network
resources, either. We’re going to help you share your Cracker Jacks
now! (After all, that’s kinda the purpose of the network, right?) You’ve got a
wireless network installed. It’s secure. It’s connected. Now you can share all
sorts of stuff with others in your family — not just your Internet connection,
but printers, faxes, extra disk space, Telephony Application Programming
Interface (TAPI) devices (telephone-to-computer interfaces and vice versa for
everybody else), games, A/V controls . . . oodles and oodles of devices.
In this chapter, we give you a taste of how you can really put your wireless
network to work. We talk about accessing shared network resources, setting
up user profiles, accessing peripheral devices across the network (such as
network printing), checking out your Network Neighborhood, and other such
goodies.
Entire books have been written about sharing your network, such as Home
Networking For Dummies (by Kathy Ivens), and other books, such as Mac OS X
All-In-One Desk Reference For Dummies (by Mark L. Chambers, Erick Tejkowski,
and Michael L. Williams) and Windows XP For Dummies (by Andy Rathbone; all
from Wiley Publishing, Inc.), include some details about networking. These are
all good books. In fact, some smart bookstore should bundle these together
with Wireless Home Networking For Dummies because they’re very complementary.
In this chapter, we expose you to the network and what’s inside it
(and there’s probably a free prize among those Cracker Jacks somewhere,
too!), and that should get you started. But if you want to know more, we urge
you to grab one of these more detailed books.
It’s one thing to attach a device to the network — either directly or as an
attachment — but it’s another to share it with others. Sharing your computer
and devices is a big step. Not only do you open yourself up to a lot of potential
unwanted visitors (like bad folks sneaking in over your Internet connection),
but you also make it easier for friendly folks (like your kids) to erase
stuff and use things in unnatural ways. That’s why you can (and should!) control
access by using passwords or by allowing users to only read (open and
copy) files on your devices (instead of changing them). In Windows 2000 and
XP, security is paramount, and you must plan how, what, and with whom you
share. Definitely take the extra time to configure your system for these extra
security layers. We tell you in this chapter about some of these mechanisms
(see the later section “Setting permissions”); the books that we mention previously
go into these topics in more detail.
A Networking Review
A Networking Review
Before we go too far into the concept of file sharing, we should review basic
networking concepts a bit (that we touch upon in earlier chapters of this
book): that is, what a network is and how it works.
Basic networking terminology
Simply defined, a network is something that links computers, printers, and
other devices together. These days, the standard protocol used for most networking
is Ethernet. A protocol is the language that devices use to communicate
to each other on a network.
For one device to communicate with another under the Ethernet protocol,
the transmitting device needs to accomplish a few things. First, it must
announce itself on the network and declare what device it’s trying to talk to.
Then it must authenticate itself with that destination device — confirming
that the sending device is who it says it is. This is done by sending a proper
name, such as a domain or workgroup name, and also a password that the
receiving device will accept.
For our purposes here, when we talk about networking, we’re talking about
sharing devices on a Windows-based network. Windows 95/98/Me start the
network tour with Network Neighborhood. In Windows XP (both Professional
and Home) and Windows 2000 Professional, this is called My Network Places.
Although both show the same information and serve the same function, My
Network Places has more layers. In Network Neighborhood, you see all the
computers and other network devices that are currently on your network.
Your computer knows this because it has been monitoring your Ethernet network
and has seen each device announce itself and what it has to offer to the
entire network when each one first powered up.
With the release of Windows XP Professional and Home, Microsoft introduced
a new look and feel to the desktop. The differences in the new look were drastic
enough that during the beta testing of XP, Microsoft decided to offer
people a choice as to which look and feel they would like by implementing
themes. When we reference the XP desktop in this chapter, we are referencing
what’s known as the Windows Classic Theme in XP. If, at any point, you’re
having trouble following any of our steps, do this:
1. Right-click the desktop and then choose Properties from the pop-up
menu that appears.
2. On the Themes tab of the Display Properties dialog box, choose
Windows Classic from the Themes pull-down menu.
You can always change the theme back without doing any damage to any
personal preferences that you set up for yourself.
Setting up a workgroup
Setting up a workgroup
To set up networking on any Windows-based computer, you need to decide on
a few basic networking options. A lot of these will be decided for you, based on
the equipment that you happen to be using on your network. As an example, if
you have a server on your wireless network, you have many more options as to
the type of network that you might create. With a server on your network, you
gain the ability to centralize your security policies and to use domains to control
devices. In Windows, a domain is a set of network resources (applications,
printers, and so on) for a group of users. The user only has to log on to the
domain to gain access to the resources, which might be located on one or a
number of different servers in the network.
If you don’t have a server (which most of us don’t on our home networks),
you’ll end up using the most common type of network: a workgroup.
The distinction between a workgroup and a domain can best be summed up
in one word: security. Domains make managing, maintaining, and modifying
security much simpler. In many cases, the domain controller — the server
that controls the domain — can set up security on each device on the network
remotely, and security can be managed in groups so that you don’t have
to add every family member to every machine or device on the network. Of
course, all this great management comes at a price. Servers tend to be expensive
and require a much higher skill level to maintain. The initial setup of a
domain can take a lot of planning and time to implement. We don’t take you
through setting up your own domain because you can find more detailed
books already written on the subject. If you do happen to choose some type
of domain for networking, keep in mind that the security of your domain is
only as strong as the security on each individual piece of equipment attached
to your network — and that includes all your wireless devices.
On the other hand, setting up a workgroup is relatively simple. All that’s
really required is to decide on the name of your workgroup. Many people use
family names or something similar. Microsoft has a default of Workgroup
MSHome for workgroups in Windows, for instance. Keep in mind that domain
and workgroup names can only be 15 characters long and cannot contain any
spaces or special characters.
To set up a workgroup in Windows 95/98/Me, you start by right-clicking the
Network Neighborhood icon on your desktop or choosing Start➪Settings➪
Control Panel and then double-clicking the Network icon. On the Identification
tab of the Network dialog box that opens, enter the following:
A simple computer name of eight characters that describes the machine
The workgroup name of no more than 15 characters
A good computer description so others on the network will have an idea
of what’s on this computer (such as Danny’s Office Machine)
To set up a workgroup in Windows 2000/XP, start by right-clicking the My
Computer icon (in the upper-left of your desktop) or by choosing Start➪
Settings➪Control Panel and then double-clicking the System icon. On the
Network Identification tab of the System Properties window that opens,
you can click the Network ID button to have a wizard walk you through the
process of setting up your networking options. A simpler method is to click the
Properties button and just enter the computer name, description, and workgroup
name (and a handy way to quickly check — and rename if necessary —
workgroup names on the computers on your network.)
Will You Be My Neighbor?
Will You Be My Neighbor?
“Hello! I’m here!” When a computer attached to a network is turned on, it
broadcasts its name to every other device on the network and asks every
device to broadcast as well. If that computer is sharing something, such as a
folder or a printer, the other devices can see it. By asking the other devices to
broadcast, it can then see all of them. This process is repeated (on average)
every 15 minutes in most networks with Windows computers attached to them.
The “Hello, I’m here” process is a great way to add devices to a network.
Unfortunately, it’s not too great at detecting if a device falls off or is disconnected
from that network. If a machine or shared device seems to be visible
on your network but doesn’t respond when you try to access it, the problem
might not be on your computer. Devices that get disconnected from your
network don’t immediately appear to be disconnected on some of your
other computers. They usually only get removed from the list of available
networked computers if they fail to answer the every-15-minute “Hello” call
from the other machines.
The Network Neighborhood (or My Network Places) icon is your ticket to the
network and seeing what shared resources are available, like a printer. (The
risk versus rewards of sharing these types of items just makes sense. The
chances of a bad guy getting into your printer and printing out documents is
really rather low — there’s not much reward for doing that.)
You can see what’s shared on your network by checking out your PC’s
Network Neighborhood (or My Network Places).
Windows 95/98/Me: Double-click your Network Neighborhood icon (usually
on your desktop), and you will see all the devices in your workgroup
or domain. You will also see an item labeled Entire Network. Under this,
you can see devices residing in other workgroups or domains that happen
to be on the same physical network as the computer that you’re working
from.
Windows 2000 and XP: Double-click the My Network Places icon (also
usually found on your desktop) to see options such as Entire Network
and Computers Near Me. Microsoft added a layer to the old Network
Neighborhood icon and consolidated the devices in the same workgroup
or domain to the Computers Near Me folder. The Entire Network folder
still shows all the available devices on your physical network. The root
of the My Network Places folder is now reserved for shortcuts to network
resources that you tend to use on a regular basis.
Looking at Network Neighborhood (see Figure 11-1) shows you all the computers
on the network, including the PC that you’re using at that particular
moment — if it happens to be set up for sharing. If a computer is networked
but not turned on, you wouldn’t see it — only turned-on computers show
up in Network Neighborhood. When you double-click a computer listed in
Network Neighborhood, a new window pops up showing you what is shared
on that computer or device.

Figure 11-1:
See
networked
Windows
95/98/Me
computers
in Network
Neighborhood.
If you’re using Windows 2000 or XP, My Network Places (see Figure 11-2)
serves a similar (but enhanced) purpose. My Network Places gives you
access to your entire network resources and also enables you to add shortcuts
to your favorite places. To check out everything that’s on your home
network, click the Entire Network icon. This will show you your workgroup.
Regardless of the operating system, you’ll always see devices set up to share
represented by small computer icons. If you double-click one of these icons,
you can see any shared printers, folders, or other devices represented by
appropriate icons. Sometimes you have to drill down (continue to doubleclick
icons) a little bit to find all the shared items on your network.
In general, you’ll see two types of devices on your network:
Standalone network devices: These are computers, storage devices,
gaming devices, and so on that have a network port and are on the network
in their own right.
Attached devices: These are peripherals, drives, or other devices that
are on the network because they’re attached to something else, like a PC.
Just double-click your workgroup to see all your home computers and other
networked devices. Click any to see what you can share within them.
All this mouse clicking can be a pain. Save your wrist and create a shortcut
to your shared resources by clicking the Add Network Place icon within My
Network Places. Shortcuts are especially handy for people who have networked
devices out on the Internet that they visit often, such as File Transfer
Protocol (FTP) sites.
If you find a computer that you expect to be on the network but it’s not, make
sure that its workgroup name is the same as the other machines — this is a
common mistake. (See the earlier section “Setting up a workgroup.”)
We find using Windows Explorer to be the best way to visualize what’s on
your computer and your network. You can get to Windows Explorer in all
Windows operating systems the same two ways. Either right-click the Start
button and select Explore, or choose Start➪Programs➪Windows Explorer.
Figure 11-3 shows Windows Explorer looking at available network resources.
Just because you see a device in the Network Neighborhood or My Network
Places doesn’t mean you can share with that device — where share means
that you can view, use, copy, and otherwise work on files and resources on
that device. The devices need to be set up for sharing for that to happen.
(Think of it like your regular neighborhood, where you can see a lot of the
houses, but you can’t go in some of them because they’re locked.) To set up
sharing, see the next section.

Figure 11-2:
See
networked
Windows
2000/XP
computers
in My
Network
Places.

Figure 11-3:
Use
Windows
Explorer to
see network
resources.
Sharing — I Can Do That!
Sharing — I Can Do That!
File sharing is a basic feature of any home network. Whether sharing MP3
files on a computer with other devices (including your stereo as we discuss
in Chapter 13) or giving access to financial files for mom and dad to access
on each other’s computers, sharing files is a way to maintain one copy of
something and not have a zillion versions all over the network.
You can share your whole computer, you might want to share only certain
things (documents or folders), or you might want to share some stuff only in
certain ways. Here’s an idea of what you can share in your network:
The whole computer: You can choose to make the whole computer or
device accessible from the network. (We really don’t advise sharing your
whole computer because it exposes all your PC to anyone who accesses
your network.)
Specific internal drives: You can share a specific hard drive, such as
one where all your MP3s are stored or your computer games.
Specific peripheral drives: You can share PC-connected or networkenabled
peripheral drives, like an extra Universal Serial Bus (USB)-
attached hard drive, a Zip or Jaz backup drive, or an external CD/DVD
read/write drive.
Files: You can set up particular folders or just a specific file to share
across your network. Note: File storage schemes on devices are hierarchical:
If you share a folder, all files and folders within that folder will be
shared. If you want to share only one file, select just that file or share a
folder with only the one file in it.
Enabling file sharing on
Windows 95/98/Me
Luckily for you, file sharing is easy. But to share files in Windows 95/98/Me,
you first must enable sharing on your PC.
After you set up sharing, your computer will need to reboot, so we recommend
that you close any and all other applications before following these steps.
To enable file sharing on your Windows 95/98/Me PC, do this:
1. Choose Start➪Settings➪Control Panel and then double-click the
Network icon.
2. On the Configuration tab of the Network dialog box, click the File and
Print Sharing button.
3. In the File and Print Sharing dialog box that appears, select the I Want
to Be Able to Give Others Access to My Files check box and then click
OK twice.
If you want to share a printer from this machine, you could also select
the I Want to Be Able to Give Other Access to My Printers check box.
4. Click OK in the dialog box that asks to restart your computer.
Your computer reboots, and your files are now ready for sharing.
Sharing a document or folder on Windows 95/98/Me
Sharing a document or folder
on Windows 95/98/Me
You don’t need to share your entire C: drive in order to share just one file. We
recommend that you create a shared folder where you put all the files that
you want to share. Because you’re opening just this one shared folder to the
network, the rest of your documents are protected.
You can never be too protected
The number of ways that someone can get on
your network multiplies with each new technology
that you add to your network. We note in
Chapter 10 that wireless local area networks
(LANs) seep out of your home and make it easy
for others to log in and sniff around. If someone
does manage to break into your network, the
most obvious places to snoop around and do
damage are the shared resources. Sharing your
C: drive (which is usually your main hard drive),
your Windows directory, or your My Documents
directory makes it easier for people to get into
your machine and do something you’d rather
they not.
You see, sharing will broadcast to the rest of the
network the fact that something is shared,
telling everyone who’s got access, your computer’s
name on the network, and how to find it.
Sharing can broadcast that availability across
firewalls, proxies, and servers. Certain types of
viruses and less-than-friendly hackers look for
these specific areas (like your shared C: drive)
in broadcast messages and follow them back to
your machine.
If you’re going to share these parts of your
system on your network, run a personal firewall
on your machines for an added layer of security,
or it will likely be compromised at some point.
Get virus software. Protect your machine, and
limit your exposure to risk. (And by all means be
sure to follow our advice in Chapter 10 for securing
your wireless network.)
To share a document on your now sharing-enabled Windows PC (whether it’s
running 95/98/Me), follow these steps:
1. Set up a space to share from.
In Windows, you do this at the folder level. If, like most of us, you use
the My Documents folder to store and organize your files, either create
or use an existing folder inside My Documents to share your files with
others.
2. Right-click the folder that contains the document that you want to
share and then choose Sharing from the shortcut menu that appears.
If you want to share full disk drives, choose the entire drive here, not
just a folder.
3. On the Sharing tab of the Properties dialog box, click Shared As.
4. Identify the shared folder on the network by using the active folder
name or entering a different name in the Share Name text box.
If you have a mixed network that has older Mac or Windows
95/98/Me/NT computers on it, keep your folder names to just eight characters
with no spaces. Eight-character names are the standard form,
compatible with those platforms, and if you want to effectively share
without problems you will not have a choice — keep those names short.
To provide a longer description of the folder, enter a comment in the
Comment box. (We recommend that you do this because some shared
documents and devices sometime have non-intuitive names.)
5. Windows 95/98/Me will allow everyone full access to any share you
set up by default.
If you want to protect your shared folder, you have the option to set up
an Access Type (see Figure 11-4), which allows read-only access or full
control based on the password, or passwords, that you set on the folder.
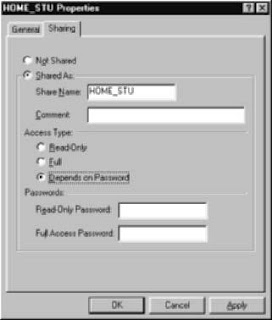
Figure 11-4:
The dialog
box where
you configure
your
shared
folder.
Enabling sharing on Windows 2000/XP
Enabling sharing on Windows 2000/XP
In Windows 2000/XP, sharing is enabled by default on each network connection
on your machine. If you have a wired network card and a wireless card,
you can have sharing enabled On on one card and Off on the other. This is
very helpful if you only want to share files on one of the networks that you
connect to. For example, if you want to share files when connected to your
home wireless network but turn off sharing when you plug your laptop in at
work, turn sharing On for your wireless card and Off for your wired Ethernet
card. When you first install a new network card, or wireless network card for
our purposes, the default is to have sharing turned On.
To enable sharing on a Windows 2000/XP machine, follow these steps, which
are quite similar to those in the preceding section:
1. Choose Start➪Settings➪Network and Dial-up Connections.
2. Right-click the icon of the network connection over which you wish to
enable File and Printer Sharing and then choose Properties from the
pop-up menu that appears.
3. On the General tab for network cards and on the Network tab for
dialup connections, you select the check box for File and Printer
Sharing for Microsoft Networks.
This enables your PC to share files and also printers.
Use Windows Explorer to find and move shared files.
When you right-click any folder or file and then select Sharing from the
pop-up menu that appears, you can control the sharing of that file.
Setting permissions
Setting permissions
In Windows 95/98/Me, you set file-sharing permissions on a folder-by-folder
basis; see the earlier section “Sharing a document or folder on Windows
95/98/Me.”
In Windows 2000/XP, controlling the sharing of files is a bit more complex
because of the enhanced security that comes with those operating systems.
To share folders and drives, you must be logged on as a member of the
Server Operators, Administrators, Power Users, or Users groups. Throughout
the rest of this section, we describe these user types and then show you how
to add users to your 2000/XP network.
User types
The Server Operators group is really only used on large networks that incorporate
Microsoft’s Active Directory technology; if you’re trying to set up your
office computer at home, you might run into this (but it’s not very likely).
The groups that you need to concern yourself with are the Administrators,
Power Users, and Users groups:
Administrators are system gods. Anyone set up as an administrator can
do anything they like — no restrictions.
Power Users can’t do as much as administrators, but they can do a lot —
as long as what they’re doing doesn’t change any of the files that make
Windows operate. In other words, Power Users can add and remove software,
users, hardware, and so on to a system as long as their actions don’t
affect any files keeping the system running the way that it’s running.
Users are just that: Users simply use what the system has to offer and
aren’t able to do anything else. The Users group provides the most
secure environment in which to run programs, and it’s by far the best
way to give access to your resources without compromising the security
of your computer and network.
How do you know what kind of access you have? Unfortunately, that’s not an
easy thing to find out unless you’re an administrator. If you know that you’re
not an administrator, the only way to find out what you can do is by trying to
do it. If you don’t have the proper access to do something, you will get a
warning message telling you exactly that — sometimes the message might
tell you what access you need to have in order to do what you want.
Adding users
For others to get access to what you have shared, you need to give them permission.
You do that by giving them a logon on your computer and assigning
them to a group — essentially adding them to the network as a user. The group
is then given certain rights within the folder that you have shared; every user
in the group has access only to what the group has access to. For more details
on this process, we strongly recommend that you use the Windows Help file to
discover how to set up new users and groups on your system.
In Windows 2000/XP, creating users and adding them to groups is best done
by using the administrator logon. If you’re using an office computer and
you’re not the administrator or a member of the Power Users group, you
won’t be able to create users. Talk to your system administrator to get permission
and help setting up your machine.
We’re guessing that you are the administrator of your home-networked computer
(it’s your network, right?), and so you do have access to the administrator
logon. Thus, you can set up new users by logging onto the machine as
administrator. Like the hierarchical folder permissions, user permissions are
hierarchal as well. If you’re a Power User, you can only create users who have
less access than yourself. By using the administrator logon, you can create
any type of user account that you might need.
Unless you’re very comfortable with the security settings of Windows
2000/XP, you should never give new user accounts more access than the
Users group provides. (For a description of user types, see the preceding section.)
Keep in mind that by creating these accounts, you’re also creating a
logon that can be used to turn on and access your computer directly. For the
purposes of sharing files and peripherals, the standard Users group provides
all the access that any individual on the network would normally need.
To add users to your network, follow these steps:
1. Choose Start➪Settings➪Control Panel and double-click the Users and
Passwords icon.
This brings up the Users and Passwords dialog box.
2. Click the Add button to launch the New User Wizard and add users to
your machine.
3. Follow the wizard’s onscreen prompts to enter a name, logon name,
description, password, and then which group the user will be part of.
New users should always start as part of the Users group (also referred
to as the Restricted Access group), which is the lowest possible access
level. Starting users at the lowest possible access level is the best way for
you to share your files without compromising your network’s security.
Accessing shared files
Whether drives, folders, or single files are set up for sharing on your wireless
home network, you access the shared thing in pretty much the same way. On
any networked PC, you simply log onto the network, head for Network
Neighborhood (or My Network Places, as the case may be), and navigate to
the file (or folder or drive) that you want to access. It’s really as easy as that.
Just because you can see a drive, folder, or file in Network Neighborhood,
however, doesn’t necessarily mean that you have access to that drive, folder,
or file. It all depends on set permissions.
Be Economical: Share Those Peripherals
Be Economical: Share Those Peripherals
Outside of the fact that there is only so much space on your desk or your
kitchen countertop, you simply don’t need a complete set of peripherals at
each device on your network. For instance, digital cameras are becoming
quite popular, and you can view pictures on your PC, on your TV, and even in
wireless picture frames around the house. But you probably only need one
color printer geared toward printing high-quality photos for someone to take
home (after admiring your wireless picture frames!).
The same is true about a lot of peripherals: business card scanners, backup
drives (such as Zip and Jaz drives), and even cameras. If you have one device
and it’s network enabled, anyone on the wireless network should be able to
access that for the task at hand.
Setting up a print server
The most common shared peripheral is a printer. Setting up a printer for
sharing is really easy, and using it is even easier.
You might have several printers in your house, and different devices might
have different printers — but they all can be shared. You might have the
color laser printer on your machine, a less expensive one (with less expensive
consumables like printer cartridges, too) for the kid’s computer, and a highquality
photo printer maybe near the TV set plugged into a USB port of a networkable
A/V device. Each of these can be used by a local device . . . if properly
set up.
Here are the steps that you need to take to share a printer:
1. Enable printer sharing within the operating system of the computer to
which the printer is attached.
2. Set up sharing for the installed printer.
We say installed printer because we assume that you’ve already installed
the printer locally on your computer or other device.
3. Remotely install the printer on every other computer on the network.
We describe remote installation in the aptly named section “Remotely
installing the printer on all network PCs.”
4. Access the printer from any PC on the network!
Throughout the rest of this section, we go through these four general steps in
much more detail.
Enabling printer sharing
Enabling printer sharing
Your first task is to enable the printer sharing within the Windows OS of the
computer to which the printer is attached. This is the same process as sharing
a folder (see the earlier section “Sharing a document or folder”) and is
available by default in Windows 2000/XP.
Windows 95/98/Me shares the printer drivers for that printer. It’s the same as
sharing a folder. Because most people will be using a workgroup type of network
(see the earlier section “Setting up a workgroup”), having the printer
drivers easily accessible makes adding those shared printers to your other
computers a lot simpler.
In the shared folder that you create, copy the printer software that came with
your printer. These days, most printers have their software on CD-ROM. The
simplest way to make that accessible is to share the CD-ROM drive of the
computer that the printer is attached to. Now you have full access to the
printer’s software without having to use up space on one of your hard drives.
Setting up sharing for the installed printer
After you enable printer sharing, it’s time to . . . can you guess? . . . share your
installed printer.
Windows 95/98/Me
To share a printer on Windows 95/98/Me, just follow these steps:
1. Go to your Printers folder by choosing Start➪Settings➪Printers and
then right-clicking the printer that you want to share.
2. From the pop-up menu that appears, choose the Sharing option.
3. Select the appropriate radio button to share the printer and then consider
adding some descriptive words in the Comment field like Photo
Printer in Living Room.
Keep in mind the eight-character limit for device names that we mention
earlier.
Just like in file sharing, you can set a password at the same place where
you activate sharing in the Sharing dialog box. We can’t see a reason to
add a password for a printer, but you might want to because some printers
(like photo printers) have high consumables costs (photo paper often
costs more than a buck per sheet). This is likely one of the reasons why
Windows 2000/XP carries its security policy to printers as well as files.
4. Click OK.
Your printer is shared. Didn’t we tell you that this was simple?
Windows 2000/XP
Windows 2000/XP are more sophisticated operating systems and subsequently
have a server type of print sharing. In other words, they offer all the
features of a big network with servers on your local machine. These features
include the ability to assign users to manage the print queue remotely,
embed printer software for easier installation, and manage when the printer
will be available based on a schedule that you define.
To share a printer on Windows 2000/XP, follow these steps:
1. Choose Start➪Settings➪Printers and Faxes (or simply choose
Start➪Printers and Faxes, depending on how your Start menu is
configured).
2. Right-click the printer in the Printers folder and choose Properties
from the pop-up menu that appears.
3. On the Sharing tab of the dialog box that appears, click the Additional
Drivers button.
4. Select which operating systems you want to support to use this shared
printer and also select the other types of drivers needed for your
other computer systems and devices; then click OK.
5. When prompted, insert a floppy disk or CD-ROM and direct the subsequent
dialog boxes to the right places on those devices to get the
driver for each operating system that you chose.
Windows finds those drivers and downloads them to the Windows
2000/XP’s hard drive. Then, when you go to install the printer on your
other computers (see the next section), the Windows 2000/XP machine,
which is sharing the printer, automatically transfers the proper printer
drivers and finishes the installation for you. Darned sweet if you ask us!
Remotely installing the printer on all network PCs
The third step is done at every other PC in the house. Basically, you install
the printer on each of these computers, but in a logical way — logically as
opposed to physically installing and connecting the printer to each computer.
You install the printer just like any other printer except that you’re installing
a network printer, and the printer installation wizard will search the network
for the printers that you want to install.
The process that you’ll use will vary depending on the operating system that
you use and the type of printer that you’re trying to install. In every case,
read the printer documentation before you start because some printers
require their software to be partially installed before you try to add the
printer. We’ve seen this a lot with multifunction printers that support scanning,
copying, and faxing.
With Windows, the easiest way to start the installation of a printer is to look
inside Network Neighborhood (or My Network Places), find the computer
sharing the printer, and double-click the shared printer. This starts the Add
Printer Wizard, which takes you through the process of adding the printer.
This wizard works like any good wizard — you’ll make a few selections and
click Next a lot. When asked for the printer drivers, use the Browse button to
direct the wizard to look in the shared folder or CD-ROM drive where you put
the printer software on the computer that the printer is attached to.
You have two options for installing a network printer:
From your Printers folder: In Window 95/98/Me, choose
Start➪Settings➪Printers to see the Printers folder where your installed
printers are shown. Double-click the Add Printer icon.
In Windows 2000/XP, choose Start➪Settings➪Printers and Faxes (or
simply Start➪Printers and Faxes, depending how your Start menu is configured).
From Network Neighborhood or My Network Places: From within
Network Neighborhood in Windows 95/98/Me (or My Network Places in
Windows 2000/XP), double-click the computer that has the printer
attached. An icon will appear showing the shared printer. Right-click it
and then choose Install from the pop-up menu that appears.
Either route leads you to the Add Printer Wizard, which guides you through
the process of adding the network printer.
Don’t start the Add Printer Wizard unless you have the disks or CDs for your
printer handy. The Add Printer Wizard will install the printer drivers (software
files that contain the info required for Windows to talk to your printers
and exchange data for printing). The wizard gets these from the CD that comes
with your printer. If you don’t have the CD, go to the Web site of your printer
manufacturer and download the driver to your desktop and install from there.
And don’t forget to delete the downloaded file(s) from your desktop when
done with installing them on the computer.
Note also that the wizard will allow you to browse your network to find the
printer that you want to install. Simply click the plus sign next to the computer
that has the printer attached, and you should see the printer below the computer.
(If not, then recheck that printer sharing is enabled on that computer.)
At the end of the wizard screens, you have the option to print a test page. We
recommend that you do this. You don’t want to wait until your child has to
have a color printout for her science experiment (naturally she waits until 10
minutes before the bus arrives to tell you!) to find out that the printer doesn’t
work.
Accessing your shared printer(s)
After you have the printers installed, how do you access them? Whenever
your Print window comes up (by pressing Ctrl+P in most applications), you
will see a field labeled Name for the name of the printer accompanied by a
pull-down menu of printer options. Use your mouse to select any printer —
local or networked — and the rest of the printing process remains the same
as if you had a printer directly plugged into your PC.
You can even make a networked printer the default printer by right-clicking
the printer and then choosing Set as Default Printer from the pop-up menu
that appears.
Sharing other peripherals
Sharing other peripherals
Sharing any other peripheral is quite similar to sharing printers. You need to
make sure that you’re sharing the device on the computer that it’s attached
to. Then you need to install that device on another PC by using that device’s
installation procedures. Obviously, we can’t be very specific about such an
installation because of the widely varying processes that companies use to
install devices. Most of the time — like with a printer — you need to install
the drivers for the device that you’re sharing on your other computers.
Note that some of the devices that you attach to your network have integral
Web servers in them. This is getting more and more common. Danny’s
AudioReQuest (www.request.com) music server, for instance, is visible on
his home network and is addressable by any of his PCs. Thus, he can download
music to and from the AudioReQuest server and sync it to his other
devices that he wants music on. Anyone else in the home can do the same —
even remotely, over the Internet. We talk more about the AudioReQuest
system in Chapter 13.
Danny has also set up a virtual CD server in his home to manage all the CDs
that his kids have for their games. This server is shared on the home network.
By using Virtual CD software from H+H Zentrum fuer Rechnerkommunikation
GmbH (www.virtualcd-online.com/default_e.htm; $75 for a five-user
license), Danny has loaded all his CDs onto a single machine so that the kids
(he’s got four kids) can access those CDs from any of their individual PCs
(he’s got four spoiled kids). Instead of looking to the local hard drive for the
CD, any of the kids’ PCs looks to the server to find the CD — hence the name
virtual CD. Now those stacks of CDs (and moans over a scratched CD!) are
gone.
Sharing between Macs and Windows-based PCs
Sharing between Macs and
Windows-based PCs
We could tell you about all sorts of ways that you can get files from Macs to
PCs — as well as kludgey ways to send them via FTP from computer to computer
— but the simple fact of the matter is this: If you have a Mac and want
to get it on a PC network, you buy a software program for the Macintosh
called DAVE. If you have a non-Apple computer that you want on your Mac
network, you go to Chapter 8 where we show you how to do that. If you have
a Mac network on which you want to share files, printers, and other peripherals,
check out the nearby sidebar, “Care for a Rendezvous?”
Care for a Rendezvous?
One cool feature that Apple has added to its
newest version of Mac OS — Mac OS v. 10.2
(often called Jaguar) — is a networking system
called Rendezvous. Rendezvous is based on an
open Internet standard (IETF [Internet Engineering
Task Force] Zeroconf) and is being
adopted by a number of manufacturers outside
of Apple.
Basically, Rendezvous (and Zeroconf) is a lot
like Bluetooth (which we discuss in Chapter 15)
in that it allows devices on a network to discover
each other without any user intervention
or special configuration. Rendezvous is being
incorporated into many products, such as printers,
storage devices (basically, networkable
hard drives), and even household electronics
like TiVos (hard drive-based television personal
video recorders [PVRs]).
Here’s one great feature about Rendezvous: On
Macs that are equipped with Apple AirPort network
adapter cards, it lets two (or more) Macs
in range of each other (in other words, within
Wi-Fi range) automatically connect to each
other for file sharing, Instant Messaging, and
such without going through any extra steps of
setting up a peer-to-peer network.
Rendezvous is enabled automatically in Mac OS
v. 10.2 computers if you turn enable Personal
Fire Sharing (found in the System Preferences;
look for the Sharing Icon) or use Apple’s iChat
Instant Messaging Program, Apple’s Safari Web
browsers, or any Rendezvous-capable printer
connected to your Airport network.
If you have a Mac, you’ve probably heard about DAVE from someone. Using
DAVE enables you to share CDs, printers, hard drives, folders, and so on.
DAVE (www.thursby.com; $149 for a single-user license) uses the fast, industry
standard Transmission Control Protocol/Internet Protocol (TCP/IP) protocol
instead of AppleTalk and is designed specifically for the Apple Macintosh.
It’s installed on the Macintosh, and no additional hardware or software is
required on the PC. There are versions for all current versions of Mac OS,
including OS X.
When you install DAVE on your Mac and launch it for the first time, the DAVE
setup assistant will launch. Follow the onscreen steps — you’ll need to tell
DAVE what type of Windows network you’ll be connecting to. (You need to
mark a check box to specify if your Windows network uses Windows NT or
Windows 2000.) You’ll also need to enter a name for your Mac as well as identify
the name of the Windows network workgroup, as we discuss earlier in
this chapter. DAVE will then automatically connect your Mac to the PC network,
asking you whether you want to share files from your Mac with PCs in
the network.
If you’re using the latest version of Mac OS X — Jaguar, or OS X v. 10.2 — your
Mac can basically work right out of the box with any Windows network for
things like file sharing. That is, if you have Mac OS X v. 10.2 (or later), you
don’t need DAVE.
Thursby also sells the program MacSOHO that enables file and printer sharing
between PCs and Macs. We don’t suggest you get this because it won’t
work with Windows XP. Microsoft has decided to eliminate support for
NetBEUI from its new release, Windows XP, and MacSOHO uses the NetBEUI
protocol. Get DAVE instead.
Gaming over a Wireless Home Network
In case you missed it, gaming is huge. We mean HUGE. The video gaming
industry is, believe it or not, bigger than the entertainment industry generated
by Hollywood. Billions of dollars per year are spent on PC game software
and hardware and on gaming consoles such as PlayStation and Xbox. You
probably know a bit about gaming — we bet you’ve at least played Minesweeper
on your PC or Pong on an Atari when you were a kid. But what you
might not know is that video gaming has moved online in a big way. And for
that, you need a network.
All three of the big gaming console vendors — Sony (www.us.playstation.
com), Microsoft (www.xbox.com), and Nintendo (www.gamecube.com) — have
created inexpensive networking kits for their latest consoles that let you connect
your console to a broadband Internet connection (such as a cable or
digital subscriber line [DSL]) to play against people anywhere in the world.
Online PC gaming has also become a huge phenomenon, with games such as
EverQuest Online attracting millions of users.
A big challenge for anyone getting into online gaming is finding a way to get
consoles and PCs in different parts of the house connected to your Internet
connection. For example, if you have an Xbox, it’s probably in your living
room or home theater, and we’re willing to bet that your cable or DSL modem
is in the home office. Lots of folks string a Cat 5e Ethernet cable down the
hall and hook it into their game machine — a great approach if you don’t
mind tripping over that cable at 2 a.m. when you let the dogs out. Enter your
wireless home network, a much better approach to getting these gaming
devices online.
In this chapter, we talk about some of the hardware requirements for getting
a gaming PC or game console online. In the case of gaming consoles, you’ll
need to pick up some extra gear because none of the current online kits contain
wireless gear. We also talk about some of the steps that you need to take
in order to configure your router (or the router in your access point [AP], if
they’re the same box in your wireless local area network [LAN]) to get your
online gaming up and running.
We’re approaching this chapter with the assumption that your wireless
gaming network will be connecting to the Internet using some sort of alwayson,
broadband connection such as DSL or a cable modem, using a home
router (either the one built into your access point or a separate one). We
have two reasons for this assumption: First, we think that online gaming
works much, much better on a broadband connection; second, because with
some console systems (particularly the Xbox), you are required to have a
broadband connection to use online gaming.
One of the biggest things that broadband brings is speed to your gaming
experience. A big part of online gaming is not so much how quickly you can
kill your opponent or crossover your dribble but how quickly the central
gaming host computer in the middle of it all knows that you performed a certain
action (and recognizes it). How frustrating to fire a missile at a helicopter
only to find out that the helicopter blew you up first because the system registered
its firing before yours. The time that it takes for your gaming commands
to cross the Internet — in gaming, at least — is often a matter of
virtual life or death.
Get your online game on!
The biggest trend in PC gaming (besides the
ever-improving quality of graphics enabled by
the newest hardware) is the development of
online gaming. Broadband Internet connectivity
has become widespread — about a quarter of
Americans use broadband at home, according to
the Pew Internet Life Survey. This has allowed
online PC gaming to grow beyond simplistic (and
low-speed) Java games (which still can be fun —
check out games.yahoo.com) and move
toward high-speed, graphics–intensive, multiplayer
games like Quake III.
If you’ve not yet checked out online gaming, you
might not realize what a big deal it is. In parts of
the world where broadband is ubiquitous — like
South Korea, where almost every home is wired
with DSL or cable — broadband online games
boast tens of millions of users. Here in the United
States, this trend has not quite reached those
proportions, but there are still millions of users
playing various multi-player online games. Face
it — it’s just plain fun to reach out and blow up
your buddy’s tank from 1,000 miles away.
You can find out how fast your connection is by pinging the other machines
or the central server. (Pinging is a process where you use an application on
your computer — usually just called ping, accessible from the DOS or CMD
window — to send a signal to another computer and see how long it takes to
get there and back, like a sonar beam on a submarine pinging another sub.)
PC Gaming Hardware Requirements
PC Gaming Hardware Requirements
We should preface this section of the book by saying that this book is not
entitled Gaming PCs For Dummies. Thus, we’re not going to spend any time
talking about PC gaming hardware requirements in any kind of detail. Our
gamer pals will probably be aghast at our brief coverage here, but we really
just want to give you a taste of what you might want to think about if you
decide to really outfit a PC for online gaming. In fact, if you’re buying a PC for
this purpose, check out the classes of computers called gaming PCs optimized
just for this application. Throughout this chapter, we use the term
gaming PC generically to mean any PC in your home that you’re using for
gaming — not just special-purpose gaming PCs.
Your best resource, we think, is to check out an online gaming Web site that
has a team of experts who review and torture-test all the latest hardware for
a living. We like CNET’s www.gamespot.com and www.gamespy.com.
At the most basic level, you really just need any modern multimedia PC (or
Macintosh for that matter) to get started with PC gaming. Just about any PC
or Mac purchased since 2002 or so will have a fast processor and a decent
graphics or video card. (You’ll hear both terms used.) If you start getting into
online gaming, start thinking about upgrading your PC with high-end gaming
hardware or even consider building a dedicated gaming machine. Some of the
key hardware components to keep in mind are the following:
Fast processor: A lot of the hard work in gaming is done by the video
card, but a fast Pentium 4 or AMD Athlon (or PowerPC G4, for Macs) central
processing unit (CPU) is always a nice thing to have.
Powerful video card: The latest cards from ATI and nVIDIA
(www.nvidia.com) contain incredibly sophisticated computer chips
that are dedicated to cranking out the video part of your games. If you
get to the point where you know what frames per second (fps) is all
about and you start worrying that yours are too low, it’s time to start
investigating faster video cards.
We’re big fans of the ATI (www.ati.com) All-In-Wonder 9700 PRO, but
then, we’re suckers for fast hardware that can crank out the polygons
(the building blocks of your game video) at mind-boggling speeds.
Fancy gaming controllers: Many games can be played by using a standard
mouse and keyboard, but you might want to look into some cool
specialized game controllers that connect through your PC’s Universal
Serial Bus (USB) ports. For example, you can get a joystick for flying
games or a steering wheel for driving games. Check out Creative
Technologies (www.creative.com) for some cool options.
Quality sound card: Many games include a Surround sound soundtrack,
just like DVDs provide in your home theater. If you’ve got the appropriate
number of speakers and the right sound card, you’ll hear the bad guys
creeping up behind you before you see them on the screen. Très fun.
Networking Requirements for PC Gaming
Networking Requirements for PC Gaming
Gaming PCs might (but don’t have to) have some different innards than regular
PCs, but their networking requirements don’t differ in any appreciable
way from the PC that you use for Web browsing, e-mail, or anything else. So
you shouldn’t be surprised to hear that connecting a gaming PC to your wireless
network is no different than connecting any PC.
You’ll need some sort of wireless network adapter connected to your gaming
PC to get it up and running on your home network (just like you need a wireless
network adapter connected to any PC running on your network, as we
discuss in Chapter 5). These adapters can fit in the PC Card slot (of a laptop
computer, for example) or connect to a USB or Ethernet port of a desktop
computer. If you have a Mac that you’re using for gaming, you’ll probably use
one of the Apple AirPort or AirPort Extreme cards (which we discuss in
Chapter 8). There’s nothing special that you need to do, hardware-wise, with
a gaming PC.
When it comes to actually playing online games, you might need to do some
tweaking to your home network’s router — which might be a standalone
device or might be part of your access point. In the upcoming sections
“Dealing with Router Configurations” and “Setting Up a Demilitarized Zone
(DMZ),” we discuss these steps in further detail.
Depending upon which games you’re playing, you might not need to do any
special configuring at all. Some games play just fine without any special
router configurations — particularly if your PC isn’t acting as the server
(meaning that other people aren’t connecting to your PC from remote locations
on the Internet).
Getting Your Gaming Console on Your Wireless Home Network
Getting Your Gaming Console on
Your Wireless Home Network
Although PC gaming can be really cool, we find that many people prefer to
use a dedicated game console device — such as a PlayStation 2 (PS2) or an
Xbox — to do their gaming. And although hard-core gamers might lean
toward PC platforms for their gaming (often spending thousands of dollars on
ultra high-end gaming PCs with the latest video cards, fastest processor and
memory, and the like), we think that for regular gamers, consoles offer some
compelling advantages:
They’re inexpensive. Price points are always dropping, but as we write,
you could buy a PS2 or Xbox for $199 or a Nintendo GameCube for even
less ($149). Even if you dedicate an inexpensive PC for gaming, you’ll
probably spend closer to $1,000 — and even more if you buy the fancy
video cards and other equipment that gives the PC the same gaming
performance as a console.
They’re simple to set up. Although it’s not all that hard to get games
running on a PC, you are dealing with a more complicated operating
system on a PC. You have to install games and get them up and running.
On a game console, you simply shove a disc into the drawer and you’re
playing.
They’re in the right room. Most folks don’t want a PC in their living
room or home theater, although some really cool models are designed
just for that purpose. A game console, on the other hand, is relatively
small and inconspicuous and can fit neatly on a shelf next to your TV.
They work with your biggest screen. Of course, you could connect a PC
to a big-screen TV system (using a special video card), and it’s getting
easier. But consoles are designed to plug right in to your TV or home
theater system, using the same cables that you use to hook up a VCR or
DVD player. You can even use the Xbox or PS2 as a DVD player!
Today’s game consoles can offer some awesome gaming experiences. Try
playing the Xbox game Halo on a big-screen TV with a Surround sound
system in place . . . it’s amazing — you can even get a full HDTV (High
Definition TV) picture on the Xbox, with certain games. And because these
gaming consoles are really nothing more than specialized computers, they
can offer the same kind of networking capabilities that a PC does — in other
words, they can fit right into your wireless home network.
Subscribe to:
Posts (Atom)


